If you read the previous post about what’s new in PowerCLI, you will have seen that we have been busy transitioning the core distribution model of PowerCLI cmdlets from Snapins to modules. This release is a hybrid deployment where you will still see several last PSSnapins. To see which PSSnapins still exist, you can run:
Get-PSSnapin -Name VMware*
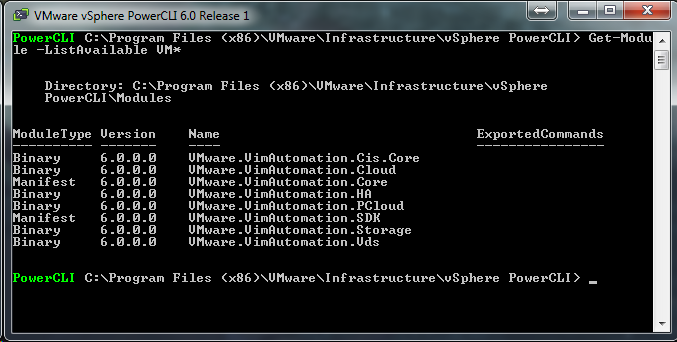
If you open your PowerCLI Modules folder (default is found at C:\Program Files (x86)\VMware\Infrastructure\vSphere PowerCLI\Modules) you will find a number of modules that have now been converted from PSSnapins:
What does this mean for PowerCLI users?
The move to modules is a good thing. PSSnapins were created when PowerShell was still in its infancy, since then modules have become the preferred method of adding onto PowerShell. The PSSnapins are compiled in .Net and require an installer, which will also add information to your computer’s registry, however, modules can be imported using the ‘Import-Module’ cmdlet and does not require any sort of installation process.
Modules also are more flexible than snapins. They allow the developers more flexibility and robustness in that a module can consist of additional scripts, manifests, binaries, and more. Allowing the developers the ability to enhance future PowerCLI releases even more.
When PowerCLI 6 installs, it adds the filepath of the new modules to the $env:PSModulePath, which allows you to use the import-module <module name> command from a PowerShell session. Additionally, you can run Get-Module -ListAvailable to see all modules that can be imported from their current directories.
You will want to look through your scripts to update any Add-PSSnapin calls for importing the modules. You can use the following code to find any instance of Add-PSSnapin in your scripts:
Get-ChildItem -Path C:\Scripts -Include *.ps1 -Recurse | Select-String -Pattern add-pssnapin
Alan Renouf has suggested to replace the Add-PSSnapin line with the following:
if ( !(Get-Module -Name VMware.VimAutomation.Core -ErrorAction SilentlyContinue) ) {
. “C:\Program Files (x86)\VMware\Infrastructure\vSphere PowerCLI\Scripts\Initialize-PowerCLIEnvironment.ps1”
}
This will allow your scripts to load the entire PowerCLI library into the PowerShell session for full PowerCLI capabilities.
***NOTE***
We’ve had several users run into an issue where PowerCLI was installed as a different user and the PSModulePath is installing to the user rather than the system-wide PSModulePath, giving the user an error. an easy fix for this is to run the following code:
|
1 2 3 4 5 6 7 8 |
#Save the current value in the $p variable. $p = [Environment]::GetEnvironmentVariable("PSModulePath") #Add the new path to the $p variable. Begin with a semi-colon separator. $p += ";C:\Program Files (x86)\VMware\Infrastructure\vSphere PowerCLI\Modules\" #Add the paths in $p to the PSModulePath value. [Environment]::SetEnvironmentVariable("PSModulePath",$p) |


The above example for ‘fixing’ the profile doesn’t work consistently as it only changes the user environment variable. To force the ‘Machine’ PSModulePath to be updated, this bit of code is a little more reliable: (and it avoids creating double entries if you run it multiple times)
I have added this to our silent install package.
$PowerCLIModulePath = “C:\Program Files (x86)\VMware\Infrastructure\vSphere PowerCLI\Modules”
$OldModulePath = [Environment]::GetEnvironmentVariable(‘PSModulePath’,’Machine’)
if ($OldModulePath -notmatch “PowerCLI”) {
Write-Host “[Adding PowerCLI Module directory to Machine PSModulePath]” -ForegroundColor Green
$OldModulePath += “;$PowerCLIModulePath”
[Environment]::SetEnvironmentVariable(‘PSModulePath’,”$OldModulePath”,’Machine’)
} else {
Write-Host “[PowerCLI Module directory already in PSModulePath. No action taken]” -ForegroundColor Cyan
}
Measure-Command { connect-viserver xxxx } | fl TotalSeconds
TotalSeconds : 56.4772673
Is it just me, or is that really slow? i figured switching to modules would take a ton of the compiling overhead off. Any tricks that we can use to speed up the module load? maybe a more current version of this? http://blogs.vmware.com/PowerCLI/2011/06/how-to-speed-up-the-execution-of-the-first-powercli-cmdlet.html
Thanks!
Jeff,
there is a known issue with this that is being worked on as we speak. One of the ways that some have seen improvements is to explicitly state the credentials in the connect-viserver command (using -credential or -username/-password). Others have also stated that including the -Protocol and the corresponding protocol http(s) decreased the time.
Hope this helps!
Thanks Brian. But no luck here…
$credential = Get-Credential
Measure-Command {connect-viserver xxxx -Credential $credential -Protocol:https } | fl TotalSeconds
TotalSeconds : 57.1843299
This is at least ridiculous. Importing the “module” carries the Snapin. Without a snapin registered the PowerCLI does not. A module does not depend on it. This is deception.
PS> Get-ChildItem -Path “C:\Program Files (x86)\VMware\Infrastructure\vSphere PowerCLI\Modules” -Include *.ps1 -Recurse | Select-String -Pattern add-pssnapin
C:\Program Files (x86)\VMware\Infrastructure\vSphere PowerCLI\Modules\VMware.VimAutomation.Core\VMware.VimAutomation.Core.ps1:19:Add-PSSnapin vmware.vimautomation.core
lol wow.. they’re telling us to remove the add-pssnapin but telling us to import a module that runs the same command? what a joke
Ran into the PSModulePath issue with the latest release posted online. I manually added to the machine environment variable, resolved the issue. I was looking to use the Get-DVSwitch to write some backup automation. I like the fact I can run modules in 64 bit and no more 32 bit powershell required 🙂
I still see the following when i get pssnappin against 6.0 R1:
Get-PSSnapin -name VMware* -Registered
Name : VMware.DeployAutomation
PSVersion : 4.0
Description : This Windows Powershell snap-in contains vSphere Auto Deploy related cmdlets for Rule-Based-Deployment
Name : VMware.ImageBuilder
PSVersion : 4.0
Description : This Windows PowerShell snap-in contains VMware ESXi Image Builder cmdlets used to generate custom images.
Name : VMware.VimAutomation.Core
PSVersion : 4.0
Description : This Windows PowerShell snap-in contains Windows PowerShell cmdlets for managing vSphere.
Name : VMware.VimAutomation.License
PSVersion : 4.0
Description : This Windows Powershell snap-in contains cmdlets for managing License components.
Why does it not match the above?
What you need to remember is that, as it states, the current release is a hybrid release with both PSSnapins and Modules, we are currently working to remove all PSSnapin dependencies in a future release. Seeing the 4 snap-in’s in your session is just fine, it is down from the 8+ you would have seen in PowerCLI 5.8
Pingback: Quick Hit – PowerCLI as a Module and Loading it up | JKavPowerShell
Pingback: theboywonder.co.uk
does any one know how to improve the loading time of
VMware.VimAutomation.Core (when i do it using import-module or addsnapin the time is the same, almost 20 seconds).
any way to improve this time?
Pingback: PowerCLI: The term 'Connect-VIServer' is not recognized ...
Pingback: PowerCLI 6.0 and vCheck, Vds Module | VirtualDataCave
Regarding vFRC PowerCLI cmdlets. It used to be in VMwareVimAutomation.Extensions and I have used it in my scripts. But with PowerCLI 6.0, my scripts are breaking down on the Get-HardDiskVFlashConfiguration cmdlet. Is it not there anymore? How do I get it working again?
Pingback: Exploring the types exposed by PowerCLI | The Shell Nut
Pingback: PowerCLI study guide – core concepts - The Crazy Consultant
welcome to this official site: pradhanmantriyojana
Installing and avtivation Webroot setup is very simple to do, you only need to visit Webroot.com/Safe and then follow the onscreen instructions. You need to download open, enter keycode, install and get protected your device by Webroot Safe.
Visit : http://www.webrootcomsafes.com
nice info sir
thank you for Sir for sharing about this post really very informative post and It’s helped me a lot
Also, visit on https://luvhacks.com